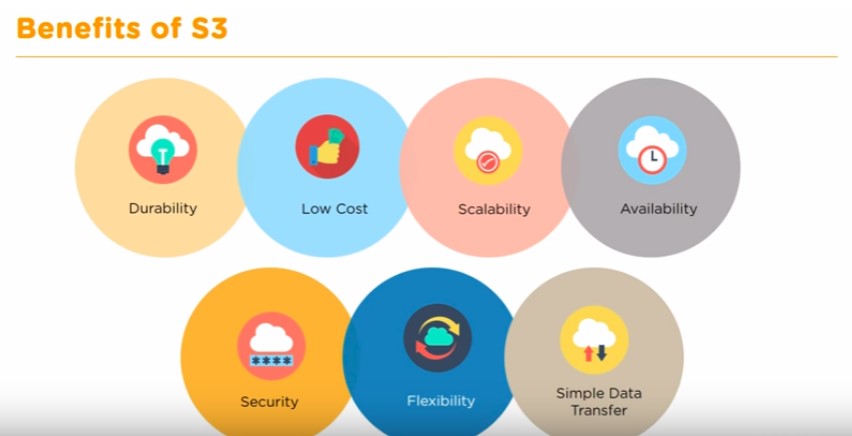
Amazon S3

Amazon S3
is easy-to-use object storage with a simple web service interface that you can use to store and retrieve any amount of data from anywhere on the web. Amazon S3 also allows you to pay only for the storage you actually use.
Advantage of Amazon S3
Create Buckets. Store data in Buckets. Download data. Permissions. Standard interfaces.
Creating 2 Buckets
Services => Storage => S3 => Create Bucket Bucket Name => Bucket1 & Bucket2 (Bucket Name should be unique globally).
regions => Mumbai & Singapore.
Next => Next => uncheck block public access => Next=>Create bucket.
Uploading Object into Bucket
click on the test bucket => Upload => Add files => select any image =>Next => Manage public permissions => Grant public read access=>Next =>Next=> Upload
Note: As bucket is public, and object is also public, anyone in the world can access the content.
Click on the Object=> Get Object URL
Using Object URL, anyone can access.
Features of S3
- Versioning
- Static website hosting
- storage classes/ tiers
- Cross region replication (CRR )
- Transfer Acceleration
- encryption
- Metadata and Tags
- ACL & Bucket policies
- Life cycle management
- Versioning is a means of keeping multiple variants of an object in the same bucket.
Create new bucket Bucket Name=> ( bucket1 ) => Region - Mumbi =>Next=>Next =>un check Block all public access => Next => create bucket.
enable versioning
Click on the bucket =>Properties tab( Observation: By default version is disabled ) =>Edit =>Enable => Save Changes.
upload one object
Upload the file from Desktop=>Next => Grant public access => Next => Next =>Upload
Advantage of versioning
- recover deleted object.
Delete the object => (Select the check box=> Actions=> Delete
Recover the object => Enable list version We can see the object and its delete marker.
select the delete marker check box=> Actions=>Delete=> Delete =>Disable list version.
Note: When we delete, object is not deleted. It is marked as deleted. So, If you remove the delete marker, We will get the object.
- We can maintain different versions of the file.
Upload the same file again. Get the object URL, and check from browser, we get the latest file. Even if you delete the file, we can recover both the versions. Select the object => actions => delete => delete
select show button We can see both the versions of the file.
2. Static website hsoting
Bucket name - bucket1 =>Next =>Next => uncheck block all public access =>Next=>Create bucket.
Select the bucket=>Properties => Static website hosting=>Edit => Enable => Host a static website => index document - index.html error document - error.html Save
Upload index.html and error.html=> Next=> Next=> Next => Upload
Now, go to the properties of the bucket => Static website hosting => get URL of the website ( endpoint )
Note: Individual files should have public access.
What is the use of error.html ?
Incase of any reason,if index.html is not accessible then error page will be displayed.
Lets make the index.html page as private. select index.html=>ACL =>Edit => public access => read => uncheck => Save Changes
Now, refresh the URL, we get error.html page!!!
- Delete the files => Delete the bucket.
3. storage classes/ tiers
Amazon S3 offers a range of storage classes that you can choose from based on the data access, resiliency, and cost requirements of your workloads.
S3 Storage Classes can be configured at the object level, and a single bucket can contain objects stored across S3 Standard, S3 Intelligent-Tiering, S3 Standard-IA, and S3 One Zone-IA.
4. Cross region replication (CRR )
Lets say, we have two buckets ( 1st bucket in Mumbi & 2nd bucket in Sidney)
We we upload the object in Mumbi, the object should also be available in Sidney).
As we are replicating an object in another region, it is called cross region replication.
vice-versa will not happen.
If we delete object in Mumbi, it will not be deleted in Sidney. If we edit object in Mumbi, it will not de edited in Sidney.
Lets create bucket bucket name - Mumbi-bucket Region - Mumbi=>Next => Next => uncheck block all public access => Next => create bucket.
Lets create 2nd bucket in Sidney Lets create bucket bucket name - Sidney-bucket Region - Sidney Next =>Next => uncheck block all public access =>Next=>create bucket.
Enable cross region replication in Mumbi bucket
Select Mumbi bucket => Management => Replication Rules =>Create Replication Rule => Enable Bucket versioning => Replication Rule Name - CRR1
Destination bucket =>Sydney bucket => Enable versioning=>IAM Role=>
( TO establish connection between two regions, we need role )
IAM Role - Create new role => Save.
Now, lets upload object in Mumbi bucket, it will be replicated in Sydni bucket!!!!
5. Transfer Acceleration
When we enable transfer acceleration, data will be transferred to edge location and then from edge location data will be transferred to bucket. ( Look at the image )
Select Mumbi bucket => Properties=> Transfer acceleration =>Edit=> Enabled => Save => Changes.
6. encryption
There are two types of encryption
- AES - 256 ( Advanced Encryption standard ) - Single encryption
- AWS - KMS ( Key management service ) - Double encryption ( More secured )
Select the required encryption.
Select the bucket => Properties => Default Encryption => Edit => Enable
7. Metadata and Tags
Metadata => To provide more information about the object in key-value pairs. Keys are predefined. eg: Content-type, Content-language etc
Tags => To provide more information about the object in key-value pairs. Keys and values we need to provide.
Select the object => Properties, we can see the metadata and tags.
8. Access Control List & Bucket policies
Select the bucket => Permissions tab => ACL Edit=>Add grantee Enter canonical ID => Save Changes
Note: ACL we can apply at bucket level and object level Select the Object and provide the access by entering canonical ID
Note: Bucket policy, we can apply only to bucket.
Select the bucket => Permission , We can see bucket policy. Bucket Policy are written in JSON Code.
Bucket policy should be defined in JSON code. Its the job of AWS administrator.
+++++++++++ Select any object => Permissions tab Observe: We do not have bucket policy. As bucket policy, we need to apply at bucket level only.
9. Life cycle management
Lets create a new bucket
Select the bucket => Management tab => Create lifecycle rule
Rule name - Myrule This rule applies to all objects => I Acknowledge Transit current version of objects between storage classes
Standard 1A =>30 Days
Add transition
One Zone-IA => 60 Days
Create Rule
From now, any object uploaded in the bucket will follow the rule for transition.