
Auto Scaling in AWS
Auto Scaling
AWS provides multiple services that you can use to scale your application. Auto scaling is enabled by Amazon CloudWatch and is available at no additional charge beyond the service fees for CloudWatch and the other AWS resources that you use.
- What is Auto Scaling?
- Befits of Auto Scaling
- Experience Auto Scaling
Step 1: Create load balancer.
Step 2: Create Launch configuration
Step 3: Create Topic in SNS ( Simple Notification Service )
Step 4: Create Auto scaling group.
Step 5: Create Alarm in CloudWatch
Step 6: Add Policy in Auto Scaling
1. What is Auto Scaling?
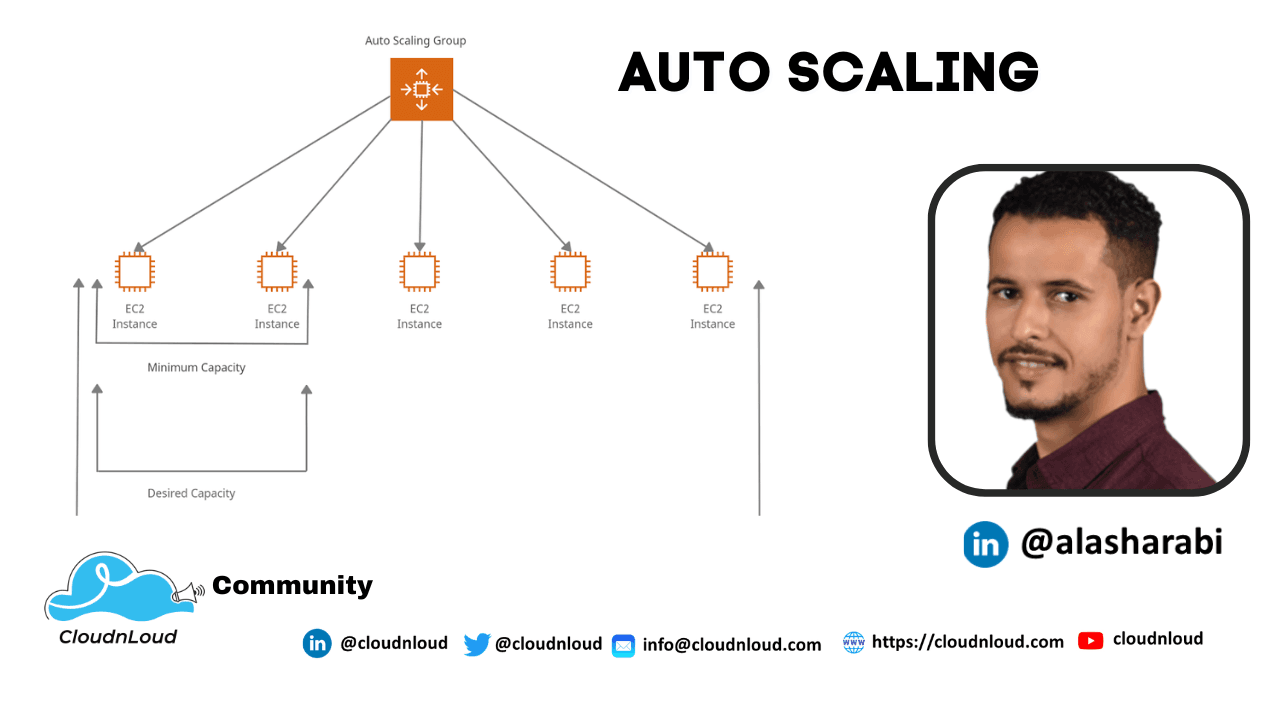
AWS Auto Scaling is a service that helps the user to monitor applications and automatically adjusts the capacity to maintain steady, predictable performance at the lowest possible cost.
Auto Scaling helps you ensure that you have the correct number of EC2 instances available to handle the load for your application.
2. Befits of Auto Scaling
- Better fault tolerance
- High availability of resources
- Better cost management
- High reliability of resources
- The high flexibility of resources
3. Understanding Launch Configuration .
Step 1: Create load balancer
 Select Mumbai location
 EC 2 dashboard =>  load balancer =>  create load balancer
 Load balancer Name => LB
 Next => Create new Security group
 Security group name => LB_Sg
 Description => LB_Sg
 => in Security group open two ports   SSH  and HTTP
 =>Next => Configure health check
Response timeout => 2
Interval => 5
Unhealthy  threshold => 2
Healthy threshold  => 2
Next => Next => Review and create => Create => Close
Step 2: Creating launch configuration
Under Auto Scaling Select Launch configurations => Create launch configuration Name: ASG =>AMI => ami-08e0ca9924195beba => t2 micro
In advanced Details User data
 #!/bin/bash
 sudo su
 yum update -y
 yum install httpd -y
cd /var/www/html
echo "MyGoogle_page2" > index.html
service httpd start
chkconfig httpd on
Next => Select existing security group : LB_Sg Create new key pair => Key Pair name => KP => download key pair => create launch configuration.
Step 3: Create Topic in SNS
 Services => Application Integration => Simple Notification Service
 Create Topic = >Type - Standard => Name - My_Topic
 Display Name - My_Topic =>Create topic.
Add subscriptions to the topic
 Create Subscription  => Protocol - Email  =>Endpoint =>  Your Email => Create
 Subscription => Confirm the subscription.
Step 4: Create Auto Scaling Group
 Select the Launch Configuration => Actions => Create Auto Scaling Group
  - Auto Scaling group name=> ASG
  - Subnet => ap-south-1a
  - Attach Existing Load Balancer => Choose from Classic Load Balancers
      => Select Load Balancer
  - Configure Group size ( Take Defaults ) =>Next => Next => Provide Name Tag =>
     Review and Create
Step 5: Create Alarm in CloudWatch
Services => Management & Governance => CloudWatch
  Alarm =>  Create Alarm => Select Metric => EC2 => By Auto Scaling Group
   => Select Auto Scaling Group Name  , Metric Name - CPU Utilization => Select Metric
   => Conditions
   => Static => Greater than > 80 => Next => Select  existing
       SNS topic ( My_Topic ) =>Next =>Alarm Name(My_Alarm) => Next => Create Alarm.

  Alarm =>  Create Alarm => Select Metric => EC2 => By Auto Scaling Group
  => Select Auto Scaling Group Name  , Metric Name - CPU Utilization
  => Select Metric => Conditions
  => Static => less than < 30 => Next => Select  existing SNS
       topic ( My_Topic) =>Next =>Alarm Name(My_Alarm2) => Next => Create Alarm.
Step 6: Add Policy in Auto Scaling
Select Auto Scaling groups => Automatic Scaling Tab => Creating Dynamic scaling Policy
Policy Type => Simple Scaling
Scaling policy name => Increase_Policy
CloudWatch Alarm=> My_alarm
Take the Action => Add => 1  Unit ( EC2 Machine ) =>Create

Select Auto Scaling groups => Automatic Scaling Tab => Creating Dynamic scaling Policy
Policy Type => Simple Scaling
Scaling policy name => Decrease_Policy
CloudWatch Alarm => My_alarm2
Take the Action => Remove => 1  Unit ( EC2 Machine ) => Create
Community and Social Footprints :