
Terraform Deployment in AWS using Terraform CLI Commands (workspace and state)

Infra as Code (IaC) | AWS Hero | Teacher | Mentor | Youtuber | -> Way to Cloud & MLOPS
Introduction
In this hands-on lab, we will create two individual environments against the same Terraform code using the terraform "workspace" command. We will also use the terraform "state" command to see what resources are being tracked in the state files of the different workspaces.

Learning Objectives
Clone Terraform Code and Switch to the Proper Directory
Create a New Workspace
Deploy Infrastructure in the Test Workspace and Confirm Deployment via the AWS Management Console
Deploy Infrastructure in the Default Workspace and Confirm Deployment via AWS Management Console
Destroy Resources in the Workspaces and Delete the Test Workspace
Let us log in to the lab server.
In a web browser, log in to the AWS Management Console using your credentials.
Clone Terraform Code and Switch to the Proper Directory
Clone the required code from the provided repository:
git clone https://github.com/samtechlab/content-hashicorp-certified-terraform-associate-foundations.git
Switch to the directory where the code is located:
cd content-hashicorp-certified-terraform-associate-foundations/section4-lesson3/
ls
The files in the directory should include main.tf and network.tf. These files basically use the ${terraform.workspace} variable to create parallel environments and decide which region the deployment occurs in, depending on the workspace you're in.

Create a New Workspace
Check that no workspace other than the default one currently exists:
terraform workspace list
The output should only show the default workspace. This workspace cannot be deleted.

Note: When you use the terraform workspace list command to view the existing workspaces, the workspace which you are currently inside will be prepended with an asterisk (*) in front of the workspace name.
Create a new workspace named test:
terraform workspace new test
You will be automatically switched into the newly created test workspace upon successful completion. However, you can confirm this using the terraform workspace list command if you'd like.

Deploy Infrastructure in the Test Workspace and Confirm Deployment via AWS
In the test workspace, initialize the working directory and download the required providers:
terraform init
View the contents of the main.tf file using the cat command:
cat main.tf
Note the configurations in the main.tf code, particularly:
AWS is the selected provider.
If the code is deployed on the default workspace, the resources will be deployed in the us-east-1 region.
If the code is deployed on any other workspace, the resources will be deployed in the us-west-2 region.
In the code creating the EC2 virtual machine, we have embedded the $terraform.workspace variable in the Name attribute, so we can easily distinguish those resources when they are created within their respective workspaces by their name:
< workspace_name >-ec2.
View the contents of the network.tf file:
cat network.tf
Note the configurations in the network.tf code, particularly:
In the code creating the security group resource, we have embedded the $terraform.workspace variable in the Name attribute, so we can easily distinguish those resources when they are created within their respective workspaces by their name:
< workspace name >-securitygroup.
Deploy the code in the test workspace:
terraform apply --auto-approve
Note: The --auto-approve flag will prevent Terraform from prompting you to enter yes explicitly before it deploys the code.
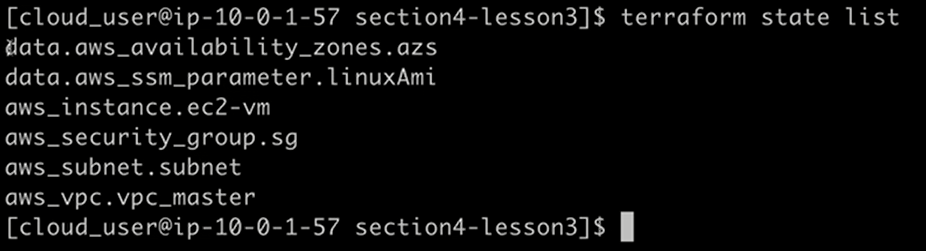
Once the code has executed successfully, confirm that Terraform is tracking resources in this workspace:
terraform state list
There should be a number of resources being tracked, including the resources spun up by the code just deployed.
Switch over to the default workspace:
terraform workspace select default
Confirm that Terraform is currently not tracking any resources in this workspace, as nothing has been deployed:
terraform state list
The return output should say that No state file was found! for this workspace.
Verify that the deployment in the test workspace was successful by viewing the resources that were created in the AWS Management Console:
Navigate to the AWS Management Console in your browser.
Click on N. Virginia (the us-east-1 region) at the top-right to engage the Region drop-down, and select US West (Oregon), or us-west-2.
Expand the Services drop-down and select EC2.
On the Resources page, click Instances.
Verify that the test-ec2 instance appears in the list.

In the menu on the left, click Security Groups.
Verify that the test-securitygroup resource appears in the list.

Deploy Infrastructure in the Default Workspace and Confirm Deployment via AWS
Back in the CLI, verify that you are still within the default workspace:
terraform workspace list
Again, the asterisk (*) prepended to the name confirms you are in the default workspace.
Deploy the code again, this time in the default workspace:
terraform apply --auto-approve
Once the code has executed successfully, confirm that Terraform is now tracking resources in this workspace:
terraform state list
There should now be a number of resources being tracked, including the resources spun up by the code just deployed.
Verify that the deployment in the default workspace was successful by viewing the resources that were created in the AWS Management Console:
Navigate to the AWS Management Console in your browser.
Click on Oregon (the us-west-2 region) at the top-right to engage the Region drop-down, and select US East (N. Virginia), or us-east-1.
As you are already on the Security Groups page, verify that the default-securitygroup resource appears in the list.

In the menu on the left, click Instances.
Verify that the default-ec2 instance appears in the list.

Destroy Resources in the Test Workspace and Delete the Workspace
Back in the CLI, switch over to the test workspace:
terraform workspace select test
Tear down the infrastructure you just created in the test workspace:
terraform destroy --auto-approve
Verify that the resources were terminated in the AWS Management Console:
Navigate to the AWS Management Console in your browser.
Click on N. Virginia (the us-east-1 region) at the top-right to engage the Region drop-down, and select US West (Oregon), or us-west-2 . As you are already on the Instances page, verify that the test-ec2 instance is shutting down or may have already been terminated.
In the menu on the left, click Security Groups.
Verify that the test-securitygroup resource no longer appears in the list.
Note: It may take some time for the resources to be terminated in the AWS Management Console, and you may need to refresh the browser a few times to confirm that the resources have been destroyed.
Back in the CLI, switch over to the default workspace:
terraform workspace select default
Delete the test workspace:
terraform workspace delete test
Tear down the infrastructure you just created in the default workspace before moving on:
terraform destroy --auto-approve
Conclusion
Congratulations — you've completed this hands-on lab!