Node js - Overview
- Node.js is a very powerful JavaScript-based platform built on Google Chrome's JavaScript V8 Engine.
- It is used to develop I/O intensive web applications like video streaming sites, single-page applications, and other web applications.
Prerequisites
Before starting with Node JS, you should have experience in:
- JavaScript
Do you know Javascript already ?
It's okay. It's very easy to understand
Node js - Intro
- Node.js is an open source server environment
- Node.js is free
- Node.js runs on various platforms (Windows, Linux, Unix, Mac OS X, etc.)
- Node.js uses JavaScript on the server
Node js - Environmental setup
Installation of NVM for Node js and Npm version management
curl -o- https://raw.githubusercontent.com/nvm-sh/nvm/v0.38.0/install.sh | bash

source ~/.bashrc

nvm list-remote

nvm install v16.17.0


# node version
node --version

#npm version
npm --version
I can understand your feelings now. It's not rocket science.
Basically, the node js is providing a runtime environment for compiling and running the Javascript application.
NPM is a package manager like Maven, PIP in other programming languages
Using NVM, We can easily downgrade and upgrade our node js and NPM package versions
Node js - First Application
Creating Node.js Application
Step 1 - Import Required Module
var http = require("HTTP");
Step 2 - Create Server
http.createServer(function (request, response) {

   response.writeHead(200, {'Content-Type': 'text/plain'});

   response.end('Hello World\n');
}).listen(8081);

// Console will print the message
console.log('Server running at http://127.0.0.1:8081/');
Step 3 - Testing Request & Response
var http = require("http");

http.createServer(function (request, response) {

   response.writeHead(200, {'Content-Type': 'text/plain'});

   response.end('Hello World\n');
}).listen(8081);

// Console will print the message
console.log('Server running at http://127.0.0.1:8081/');
Now execute the main.js to start the server as follows
node main.js
Verify the Output. Server has started.
Server running at http://127.0.0.1:8081/
output
Congratulations, you have your first HTTP server up and running which is responding to all the HTTP requests at port 8081.

Callbacks
What is callback?
Callback is an asynchronous equivalent for a function. A callback function is called at the completion of a given task.
For example , a function to read a file may start reading file and return the control to the execution environment immediately so that the next instruction can be executed. Once file I/O is complete, it will call the callback function while passing the callback function, the content of the file as a parameter. So there is no blocking or wait for File I/O.
This makes Node.js highly scalable, as it can process a high number of requests without waiting for any function to return results.
Blocking Code Example
Create a text file named input.txt with the following content
Tutorials Point is giving self learning content
to teach the world in simple and easy way!!!!!
Create a js file named main.js with the following code
var fs = require("fs");
var data = fs.readFileSync('input.txt');

console.log(data.toString());
console.log("Program Ended");
Now run the main.js to see the result
node main.js
Verify the Output.
Tutorials Point is giving self learning content
to teach the world in simple and easy way!!!!!
Program Ended
Non-Blocking Code Example
Update main.js to have the following code −
var fs = require("fs");

fs.readFile('input.txt', function (err, data) {
   if (err) return console.error(err);
   console.log(data.toString());
});

console.log("Program Ended");
Now run the main.js to see the result
node main.js
Verify the Output.
Program Ended
Tutorials Point is giving self learning content
to teach the world in simple and easy way!!!!!
These two examples explain the concept of blocking and non-blocking calls.
The first example shows that the program blocks until it reads the file and then only it proceeds to end the program.
The second example shows that the program does not wait for file reading and proceeds to print "Program Ended" and at the same time, the program without blocking continues reading the file.
Event Loop
Node.js is a single-threaded application, but it can support concurrency via the concept of events and callbacks.
Every API of Node.js is asynchronous and being single-threaded, they use async function calls to maintain concurrency.
Node uses observer pattern.
The node thread keeps an event loop and whenever a task gets completed, it fires the corresponding event which signals the event-listener function to execute.
Event-Driven Programming
Node.js uses events heavily and it is also one of the reasons why Node.js is pretty fast compared to other similar technologies.
In an event-driven application, there is generally a main loop that listens for events and then triggers a callback function when one of those events is detected.
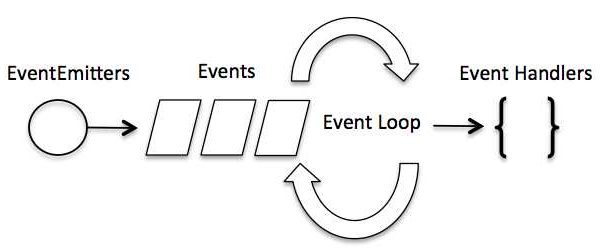
Event Emitter
Many objects in a Node emit events, for example, The server emits an event each time a peer connects to it, and an fs. read stream emits an event when the file is opened. All objects which emit events are instances of events.EventEmitter.
EventEmitter Class
// Import events module
var events = require('events');

// Create an eventEmitter object
var eventEmitter = new events.EventEmitter();

// Bind event and event  handler as follows
eventEmitter.on('eventName', eventHandler);

// Fire an event
eventEmitter.emit('eventName');
Example
Create a js file named main.js with the following code −
// Import events module
var events = require('events');

// Create an eventEmitter object
var eventEmitter = new events.EventEmitter();

// Create an event handler as follows
var connectHandler = function connected() {
   console.log('connection succesful.');

   // Fire the data_received event
   eventEmitter.emit('data_received');
}

// Bind the connection event with the handler
eventEmitter.on('connection', connectHandler);

// Bind the data_received event with the anonymous function
eventEmitter.on('data_received', function() {
   console.log('data received succesfully.');
});

// Fire the connection event
eventEmitter.emit('connection');

console.log("Program Ended.");
Now let's try to run the above program and check its output
node main.js
It should produce the following result
connection successful.
data received successfully.
Program Ended.
Hope you are able to understand till here
Streams
What are Streams?
Streams are objects that let you read data from a source or write data to a destination in a continuous fashion. In Node.js, there are four types of streams
Readable − Stream which is used for reading operation.
Writable − Stream which is used for the write operation.
Duplex − Stream which can be used for both reading and writing operations.
Transform − A type of duplex stream where the output is computed based on input.
Reading from a Stream
Create a text file named input.txt having the following content
Tutorials Point is giving self-learning content
to teach the world in a simple and easy way!!!!!
Create a js file named main.js with the following code
var fs = require("fs");
var data = '';

// Create a readable stream
var readerStream = fs.createReadStream('input.txt');

// Set the encoding to be utf8.
readerStream.setEncoding('UTF8');

// Handle stream events --> data, end, and error
readerStream.on('data', function(chunk) {
   data += chunk;
});

readerStream.on('end',function() {
   console.log(data);
});

readerStream.on('error', function(err) {
   console.log(err.stack);
});

console.log("Program Ended");
Now run the main.js to see the result
node main.js
Verify the Output.
Program Ended
Tutorials Point is giving self learning content
to teach the world in simple and easy way!!!!!
Writing to a Stream
Create a js file named main.js with the following code
var fs = require("fs");
var data = 'Simply Easy Learning';

// Create a writable stream
var writerStream = fs.createWriteStream('output.txt');

// Write the data to stream with encoding to be utf8
writerStream.write(data,'UTF8');

// Mark the end of file
writerStream.end();

// Handle stream events --> finish, and error
writerStream.on('finish', function() {
   console.log("Write completed.");
});

writerStream.on('error', function(err) {
   console.log(err.stack);
});

console.log("Program Ended");
Now run the main.js to see the result
node main.js
Verify the Output.
Program Ended
Write completed.
Piping the Streams
Piping is a mechanism where we provide the output of one stream as the input to another stream. It is normally used to get data from one stream and to pass the output of that stream to another stream. There is no limit on piping operations.
var fs = require("fs");

// Create a readable stream
var readerStream = fs.createReadStream('input.txt');

// Create a writable stream
var writerStream = fs.createWriteStream('output.txt');

// Pipe the read and write operations
// read input.txt and write data to output.txt
readerStream.pipe(writerStream);

console.log("Program Ended");
Now run the main.js to see the result
node main.js
Verify the Output.
Program Ended
Open output.txt created in your current directory; it should contain the following −
Tutorials Point is giving self learning content
to teach the world in simple and easy way!!!!!
How do you feel now ?
File system
Node implements File I/O using simple wrappers around standard POSIX functions. The Node File System (fs) module can be imported using the following syntax
var fs = require("fs")
Example
Create a text file named input.txt with the following content
Tutorials Point is giving self learning content
to teach the world in simple and easy way!!!!!
Let us create a js file named main.js with the following code −
var fs = require("fs");

// Asynchronous read
fs.readFile('input.txt', function (err, data) {
   if (err) {
      return console.error(err);
   }
   console.log("Asynchronous read: " + data.toString());
});

// Synchronous read
var data = fs.readFileSync('input.txt');
console.log("Synchronous read: " + data.toString());

console.log("Program Ended");
Now run the main.js to see the result
node main.js
Verify the Output.
Synchronous read: Tutorials Point is giving self learning content
to teach the world in simple and easy way!!!!!

Program Ended
Asynchronous read: Tutorials Point is giving self learning content
to teach the world in simple and easy way!!!!!
Utility Modules
There are several utility modules available in Node.js module library. These modules are very common and are frequently used while developing any Node-based application.
Module Name & Description
1 OS Module Provides basic operating-system-related utility functions.
2 Path Module Provides utilities for handling and transforming file paths.
3 Net Module Provides both servers and clients as streams. Acts as a network wrapper.
4 DNS Module Provides functions to do actual DNS lookup as well as to use underlying operating system name resolution functionalities.
5 Domain Module Provides ways to handle multiple different I/O operations as a single group.
Congratulations, Encourage yourself. Now you completed the basics
Do you want to learn How to build REST API in node js further?
Express Framework
RestFul API
REST stands for REpresentational State Transfer .
REST is web standards-based architecture and uses HTTP Protocol.
A REST Server simply provides access to resources and REST client accesses and modifies the resources using HTTP protocol.
Here each resource is identified by URIs/ global IDs. REST uses various representations to represent a resource like text, JSON, XML but JSON is the most popular one.
HTTP methods
The following four HTTP methods are commonly used in REST-based architecture.
GET − This is used to provide read-only access to a resource.
PUT − This is used to create a new resource.
DELETE − This is used to remove a resource.
POST − This is used to update an existing resource or create a new resource.
Creating REST API
Consider we have a JSON-based database of users having the following users in a file users.json
{
   "user1" : {
      "name" : "mahesh",
      "password" : "password1",
      "profession" : "teacher",
      "id": 1
   },

   "user2" : {
      "name" : "suresh",
      "password" : "password2",
      "profession" : "librarian",
      "id": 2
   },

   "user3" : {
      "name" : "ramesh",
      "password" : "password3",
      "profession" : "clerk",
      "id": 3
   }
}
Based on this information we are going to provide the following RESTful APIs.
- listUsers GET empty Show list of all the users.
- addUser POST JSON String Add details of new user.
- deleteUser DELETE JSON String Delete an existing user.
- :id GET empty Show details of a user.
List Users
var express = require('express');
var app = express();
var fs = require("fs");

app.get('/listUsers', function (req, res) {
   fs.readFile( __dirname + "/" + "users.json", 'utf8', function (err, data) {
      console.log( data );
      res.end( data );
   });
})

var server = app.listen(8081, function () {
   var host = server.address().address
   var port = server.address().port
   console.log("Example app listening at http://%s:%s", host, port)
})
Now try to access defined API using URL: http://127.0.0.1:8081/listUsers
This should produce following result
{
   "user1" : {
      "name" : "mahesh",
      "password" : "password1",
      "profession" : "teacher",
      "id": 1
   },

   "user2" : {
      "name" : "suresh",
      "password" : "password2",
      "profession" : "librarian",
      "id": 2
   },

   "user3" : {
      "name" : "ramesh",
      "password" : "password3",
      "profession" : "clerk",
      "id": 3
   }
}
Add User
var express = require('express');
var app = express();
var fs = require("fs");

var user = {
   "user4" : {
      "name" : "mohit",
      "password" : "password4",
      "profession" : "teacher",
      "id": 4
   }
}

app.post('/addUser', function (req, res) {
   // First read existing users.
   fs.readFile( __dirname + "/" + "users.json", 'utf8', function (err, data) {
      data = JSON.parse( data );
      data["user4"] = user["user4"];
      console.log( data );
      res.end( JSON.stringify(data));
   });
})

var server = app.listen(8081, function () {
   var host = server.address().address
   var port = server.address().port
   console.log("Example app listening at http://%s:%s", host, port)
})
Check the URL: http://127.0.0.1:8081/addUser in the browser
output
{
   "user1":{"name":"mahesh","password":"password1","profession":"teacher","id":1},
   "user2":{"name":"suresh","password":"password2","profession":"librarian","id":2},
   "user3":{"name":"ramesh","password":"password3","profession":"clerk","id":3},
   "user4":{"name":"mohit","password":"password4","profession":"teacher","id":4}
}
Show Detail
var express = require('express');
var app = express();
var fs = require("fs");

app.get('/:id', function (req, res) {
   // First read existing users.
   fs.readFile( __dirname + "/" + "users.json", 'utf8', function (err, data) {
      var users = JSON.parse( data );
      var user = users["user" + req.params.id]
      console.log( user );
      res.end( JSON.stringify(user));
   });
})

var server = app.listen(8081, function () {
   var host = server.address().address
   var port = server.address().port
   console.log("Example app listening at http://%s:%s", host, port)
})
Check the URL: http://127.0.0.1:8081/2 in the browser
result
{"name":"suresh","password":"password2","profession":"librarian","id":2}
Delete User
var express = require('express');
var app = express();
var fs = require("fs");

var id = 2;

app.delete('/deleteUser', function (req, res) {
   // First read existing users.
   fs.readFile( __dirname + "/" + "users.json", 'utf8', function (err, data) {
      data = JSON.parse( data );
      delete data["user" + 2];

      console.log( data );
      res.end( JSON.stringify(data));
   });
})

var server = app.listen(8081, function () {
   var host = server.address().address
   var port = server.address().port
   console.log("Example app listening at http://%s:%s", host, port)
})
Check the URL: http://127.0.0.1:8081/deleteUser in the browser
output
{"user1":{"name":"mahesh","password":"password1","profession":"teacher","id":1},
"user3":{"name":"ramesh","password":"password3","profession":"clerk","id":3}}
That's it guys. It's done. let's celebrate
Important
- Please do lot of POCs using node js
- Contribute on Open source projects & communities
- Keep posting on LinkedIn
Keep Learning & Keep Growing